
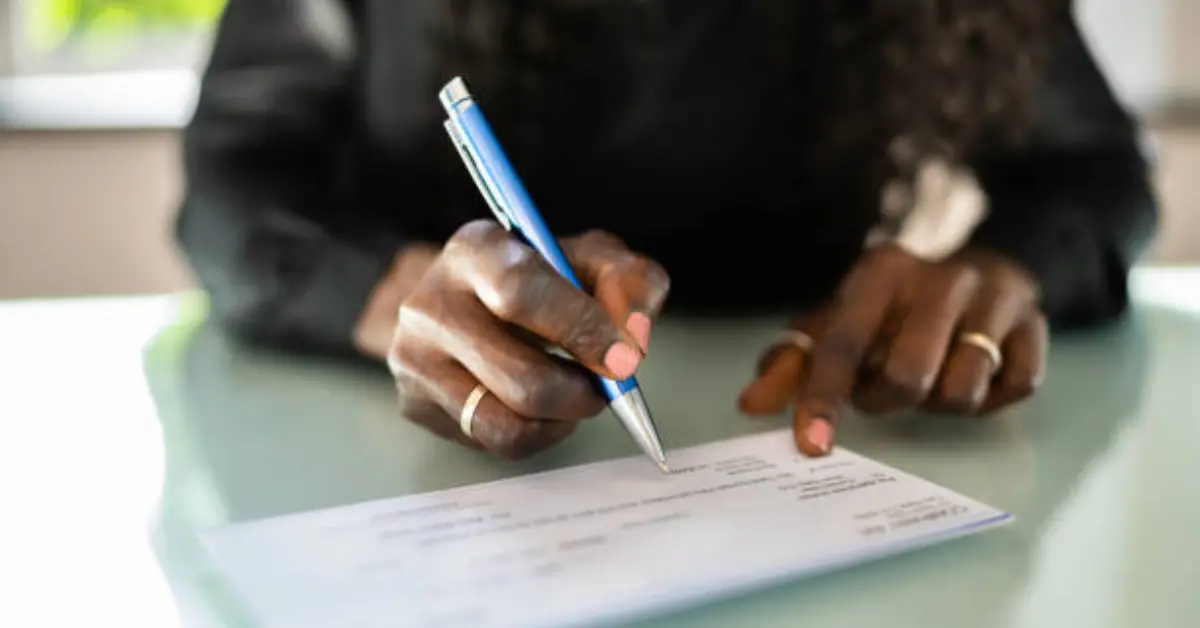
How to Write a Check: A Step-by-Step Guide
Writing a check may seem like an outdated skill in today’s digital age, but there are still plenty of situations where it’s the best option. Whether you’re paying rent, sending a gift, or handling a legal transaction, knowing how to write a check properly can save you from a lot of headaches. If you’ve never written one before—or if it’s been a while since your last check—this guide will walk you through the process from start to finish. We’ll cover each section of a check, common mistakes to avoid, and tips for special situations like writing a check without cents or postdating one.
In fact, understanding how to fill out a check properly is more important than ever. Even with the rise of mobile payments and digital banking, checks continue to be a preferred method of payment in certain circumstances. Some businesses, government offices, and even charities still rely on checks to process payments. So, let’s dive into how you can write a check with confidence, whether you’re doing it for the first time or refreshing your memory.
Ready to learn the ropes? Keep reading as we guide you through this important yet simple skill that’s been a part of financial transactions for decades. By the end of this post, you’ll be able to write a check like a pro—no matter the situation!
Why Writing Checks Still Matters
In today’s world of instant payments and mobile banking, it’s easy to think that writing checks is a thing of the past. However, checks remain a vital payment method on many situations where digital options may not be available or desirable. Whether you’re making a large payment, dealing with a small business, or paying for a government service, knowing how to write a check can be surprisingly useful.
Checks Are Still Preferred for Some Payments
While online payment options like Venmo, PayPal, or credit cards have become the norm for everyday transactions, checks are often still the preferred method for certain payments. For example, many landlords request rent payments via check rather than digital transactions. Why? It’s simple: checks can help avoid the high processing fees that come with debit and credit card transactions. Similarly, charitable organizations and small businesses often prefer checks because they save money on transaction fees. If you’re sending a large donation, you might find that a check is the easiest way to handle the payment without incurring extra costs.
Checks Offer a Higher Level of Security
Checks also offer a level of security that digital payments sometimes lack. When you write a check, you have a physical record of the transaction. You can keep a check register to track all your payments and avoid overdraft fees. In contrast, digital payments can sometimes be harder to track or may involve third-party platforms, making it harder to trace the flow of funds. Additionally, checks can be postdated or voided if necessary, offering you more control over the timing of your payment.
Checks Are Sometimes the Only Option
Lastly, there are certain situations where checks are the only acceptable method of payment. Some government offices or institutions require checks for payments related to permits, fees, or fines. Additionally, some service providers—especially in rural areas or for specialized services—might only accept checks. Understanding how to write a check ensures you’re prepared for these situations, even in a cashless world.
So, while digital payments are great, checks are far from obsolete. Learning to write a check properly gives you flexibility and reliability when you need it most.
Step-by-Step Guide on How to Write a Check
Writing a check is simpler than you might think, and with a little practice, you’ll be able to do it quickly and accurately. Each section the a check serves a specific purpose, and understanding how to fill out each one is key to making sure the check is valid. In this section, we’ll walk you through each step, showing you exactly how to write a check properly, with helpful tips along the way.
Step 1: Fill Out the Date
The first thing you need to do when writing a check is to fill out the date. This goes in the upper right-hand corner of the check.
Why is the date important?
The date is used to indicate when the check was written. It also helps the bank and recipient track when the payment was made, which can be crucial for keeping accurate records.
How to write the date:
You can write the date in one of two ways:
- Full format: January 1, 2025
- Numeric format: 01/01/2025
Make sure the date is clear and legible. Also, ensure that you’re not postdating the check unless it’s absolutely necessary (more on that later). If you postdate a check, the recipient may not be able to deposit it until the future date you specify.
Step 2: Write Who the Check Is For
Now it’s time to fill out who the check is made payable to. This is where you write the name of the person or business that will be receiving the check.
Why is this important?
Accurate spelling of the recipient’s name ensures there won’t be any issues when they try to deposit or cash the check. This step is crucial for avoiding any confusion or potential problems during processing.
How to fill it out:
- Write the name of the individual or business on the “Pay to the Order of” line.
- If you’re unsure about the spelling, take a moment to double-check. Even a small mistake could delay the processing of the check.
Tip: If you’re paying a business, use the exact name as it appears on their account. Some businesses use abbreviations, so it’s always a good idea to confirm.
Step 3: Write the Amount in Numbers
Next, you’ll write the amount of money being paid in numerical form. This goes in the small box to the right of the “Pay to the Order of” line.
Why is this important?
This ensures that both the amount in words (which we’ll fill out next) and the numeric amount match exactly. If these two amounts don’t align, the check may be rejected or delayed.
How to fill it out:
- Write the amount as close to the left side of the box as possible, with no spaces before the dollar sign. This prevents anyone from altering the amount later.
- Example: $150.75
Tip: If you’re writing a check with a smaller amount (e.g., under $10), make sure to still place the decimal after the dollar amount (e.g., $5.00). Don’t leave the cents part blank, even if it’s zero.
Step 4: Write the Amount in Words

Disclosure: This post may contain affiliate links, meaning if you decide to make a purchase via my links, I may earn a commission at no additional cost to you.
This is a step that often confuses people, but it’s crucial for preventing fraud and ensuring the check is valid. The next line on the check is where you write the amount in words, matching the numeric amount from Step 3.
Why is this important?
Writing the amount in words provides an additional level of verification to ensure that there is no confusion about the check’s value. It also acts as a safeguard if the numeric value is altered.
How to fill it out:
- Write the amount in words, and remember to include both the dollar amount and cents. Use “and” to separate the dollar amount from the cents.
- Example: One hundred fifty and 75/100 dollars
- If the check doesn’t include cents, you can simply write: One hundred fifty and 00/100 dollars or One hundred fifty dollars.
Tip: If there’s extra space at the end of the line, draw a line to the far right to prevent anyone from adding extra numbers or words.
Step 5: Fill Out the Memo Line
The memo line on the bottom left of the check is where you can add a note about what the check is for. While this section is optional, it can help you stay organized and keep track of your payments.
Why is this important?
Including a note on the memo line is especially helpful for both you and the recipient. It’s a good place to jot down what the payment is for—whether it’s for rent, a birthday gift, or a bill. This can also help if the check ever gets lost or if you need to look back at the payment details later.
How to fill it out:
- Write a brief note indicating what the check is for. Examples include:
- Rent for April
- Wedding gift for Jane
- Invoice #1234 payment
Tip: Some businesses or government offices may require that you include a specific reference number, such as your account or invoice number, on the memo line. Double-check any instructions you may have received.
Step 6: Sign the Check
The final step is to sign the check. This is your authorization to the bank to release the funds from your account.
Why is this important?
A check cannot be processed without your signature. It’s your confirmation that you’re authorizing the payment and agreeing to the terms.
How to fill it out:
- Sign the check on the bottom-right line, using the same signature that is on file with your bank.
- Make sure your signature is clear and legible. If it’s difficult to read, the bank may have trouble processing your check.
Tip: Don’t sign the check until the other sections are filled out. Signing a blank check can be risky, as it leaves room for fraud.
Final Checklist: Ensuring a Valid Check
Before you send your check, review it one last time to make sure all the details are correct. Here’s a quick checklist:
- Date: Is the date written clearly in the correct format?
- Payee Name: Have you spelled the recipient’s name correctly?
- Amount in Numbers: Does the numeric value match the amount in words?
- Amount in Words: Is the dollar amount written clearly with “and” for cents?
- Memo Line: Did you include a brief note or reference?
- Signature: Have you signed the check clearly and legibly?
By following these steps, you can ensure that your check is filled out properly and ready for deposit. Take your time with each step to avoid mistakes, and always keep a record of the check in your checkbook or digital system to track your payments.
With this guide, you’re well on your way to writing checks like a pro—whether you’re paying for everyday expenses or making special payments like donations or gifts.
Common Check Writing Mistakes to Avoid
Writing a check is simple, but it’s easy to make small mistakes that can cause big headaches. Whether you’re a first-time check writer our just need a refresher, it’s essential to be aware of the common mistakes people make when filling out a check. Below are some of the most frequent errors and how to avoid them, ensuring your check is processed smoothly.
1. Mismatched Amounts
One of the most common mistakes is when the amount written in numbers doesn’t match the amount written in words. This can cause confusion for the bank or recipient and may result in the check being rejected.
How to avoid it:
Double-check that both the numerical amount (e.g., $150.75) and the written amount (e.g., One hundred fifty and 75/100 dollars) are identical. This step is crucial for preventing any issues with check processing.
2. Leaving Blank Spaces
Leaving blank spaces on the check, especially in the amount box or the “Pay to the Order of” section, makes the check vulnerable to fraud. A thief could easily add numbers or change the recipient’s name.
How to avoid it:
Write the amount as close to the left side of the box as possible, leaving no unnecessary space. Also, draw a line through any blank areas to prevent alterations.
3. Postdating a Check Improperly
Postdating means writing a future date on the check, which some people do when they don’t have enough funds in their account at the moment or want to delay the payment. However, postdated checks can be problematic because they may not be processed on time or can lead to overdraft fees.
How to avoid it:
Only postdate a check if it’s absolutely necessary, and understand that the recipient may still try to deposit it before the date. If you do postdate, make sure the future date is clear, but avoid it whenever possible.
4. Forgetting to Sign the Check
A check without a signature is invalid and cannot be processed by the bank.
How to avoid it:
Always sign the check at the end. Don’t sign it until you’ve filled out the rest of the check to avoid mistakes.
5. Using Pencil Instead of Ink
Some people make the mistake of writing checks with a pencil, thinking it’s easier to make changes. However, pencil marks can be erased and altered, making the check more susceptible to fraud.
How to avoid it:
Always use a pen with permanent ink when writing checks. This ensures that the information remains secure and unalterable.
By avoiding these common check-writing mistakes, you can ensure that your checks are valid and will be processed without any issues. Double-check your work to avoid costly errors and protect yourself from potential fraud.
How to Write Checks in Special Cases
While writing a check for standard payments like rent or a utility bill is relatively straightforward, there are some special cases that require a bit more attention to detail. Whether you’re writing a check with no cents, dealing with postdated checks, or making a check out to yourself, understanding how to handle these special situations is crucial. Below, we’ll cover some of these unique scenarios and explain exactly how to fill out the check properly.
How to Write a Check with No Cents
It’s common to write checks for round amounts, such as $100 or $250, where there are no cents involved. While this may seem simple, there are some key steps to follow to make sure the check is still filled out correctly.
How to fill it out:
- Numeric form: Write the dollar amount followed by “.00” to indicate that there are no cents. For example, if you’re writing a check for $100, write it as $100.00.
- Written form: Write the amount in words and include the cents part as “00/100” or simply state “and 00/100 dollars.” For example: One hundred and 00/100 dollars.
Tip: Even when the amount doesn’t include cents, always remember to add the “00/100” to the written amount. Leaving it out could make the check look incomplete or lead to confusion.
How to Write a Check for Cents Only
Although it’s rare, you might find yourself needing to write a check for only a few cents, like $0.75 or $1.25. While it’s not common, it’s good to know the proper way to write these types of checks to avoid any mistakes.
How to fill it out:
- Numeric form: Write the dollar amount as usual, followed by the cents. For example, for $0.75, write $0.75.
- Written form: Write the amount in words, making sure to clearly state the cents. For example: Zero dollars and 75/100 or Only seventy-five cents.
Tip: If you’re writing a check with cents only, don’t skip the dollar amount. Even though the dollar part is zero, it should still be included for clarity. Also, avoid abbreviating the “and” when stating cents—it’s important for the check to be as clear as possible.
How to Postdate a Check
Postdating a check means writing a future date on the check. This is sometimes done when the writer wants the payment to be processed on a specific future date, usually when the funds won’t be available until that time. However, postdating checks can be risky because the recipient may deposit the check before the date you’ve written, potentially causing an overdraft.
How to fill it out:
- Simply write the future date on the check as you would with a current date, but make sure it’s clear that the payment should not be processed until that date.
Tip: Before postdating a check, confirm with the recipient that they agree to wait until the specified date to deposit it. Some banks may process postdated checks early, which could lead to complications.
How to Write a Check to Yourself
Writing a check to yourself is a straightforward process, but it’s important to follow the correct steps to ensure everything is processed properly. This situation typically arises when you want to withdraw cash from your own checking account.
How to fill it out:
- On the “Pay to the Order of” line, write your name.
- Fill in the amount just like you would on any other check (in both numbers and words).
- Sign the check in the bottom-right corner as you normally would.
Tip: Writing a check to yourself is essentially the same as withdrawing money from your account. You can deposit the check or cash it, depending on your needs.
How to Write a Check for a Specific Purpose
Sometimes, checks need to be written for a specific purpose, such as paying a bill, making a donation, or fulfilling a contractual obligation. This can be especially important if you need to document exactly what the check is for.
How to fill it out:
- Use the memo line to clarify the purpose of the check. For instance, you might write “Rent for June” or “Donation for Charity X” to specify the reason for the payment.
- If you’re paying for something like a deposit or a down payment, be sure to reference the contract or agreement number on the memo line.
Tip: Always keep a record of these types of checks, as they may be needed for tax or legal purposes later on.
Final Thoughts on Special Cases
Though writing checks for standard payments is a straightforward process, handling special cases requires a bit more attention to detail. Whether you’re writing a check with no cents, postdating one, or paying a specific bill, following the correct steps ensures that your check is processed without any issues. By understanding how to handle these special cases, you can feel confident in your ability to write checks for any situation that arises.
With these tips in hand, you’re now ready to tackle even the trickiest check-writing situations with ease.
Frequently Asked Questions (FAQs)
Writing a check can be straightforward, but it’s common to have some questions about the finer details. Below are some frequently asked questions that can help clarify any confusion you may have when filling out a check.
1. How Do I Write a Check to Myself?
Writing a check to yourself is simple and often used when you want to withdraw funds from your checking account or cash a check. Here’s how to do it:
- On the “Pay to the Order of” line, write your own name.
- Fill in the amount, both numerically (e.g., $100.00) and in words (e.g., One hundred dollars).
- Sign the check at the bottom-right corner.
Once you’ve done this, you can either deposit or cash the check at your bank.
2. Can I Postdate a Check?
Yes, you can postdate a check, which means writing a future date on the check. This is commonly done when you want the payment to be processed on a specific future date. However, there are some important things to consider:
- The recipient may deposit the check before the date you’ve specified, which could result in overdraft fees if the funds are not available.
- Some banks may choose to process postdated checks early, so it’s important to confirm with your bank and the check recipient before postdating.
It’s always a good idea to avoid postdating unless absolutely necessary.
3. What Happens if I Make a Mistake on a Check?
If you make a mistake while writing a check, it’s best to void the check and start over. Here’s what you should do:
- Write “VOID” in large letters across the entire check, including the amount and recipient.
- Don’t attempt to use the check again. Instead, keep it in a secure place or shred it to prevent potential fraud.
If the check is already signed and you don’t want to void it, simply write a new check. Always double-check your work to avoid this situation.
4. How Do I Write a Check Without Cents?
When writing a check for a round amount with no cents (e.g., $100), write it as follows:
- In the numeric box: $100.00
- In the word section: One hundred and 00/100 dollars
Including “00/100” for the cents ensures the check is clear and complete.
5. What Should I Do If I Lose a Checkbook?
If you lose a checkbook, it’s crucial to act quickly:
- Contact your bank to report the lost checkbook. They can place a stop payment on any checks that may have been stolen.
- Monitor your account for unauthorized transactions and immediately report any suspicious activity to your bank.
- Order a new checkbook and update any recurring payments or account information as necessary.
Losing a checkbook can be stressful, but prompt action can help protect your finances.
By understanding these common questions, you can write checks confidently and avoid common pitfalls. Always double-check your work, and remember that using checks properly ensures smooth financial transactions.
Alternatives to Writing Checks
While checks are still a useful tool for certain transactions, there are many modern alternatives that can be faster, more convenient, and more secure. Whether you’re looking to avoid the hassle of writing checks or simply want a more digital-friendly option, these alternatives can streamline your payment process.
1. Debit and Credit Cards
One of the most popular alternatives to writing checks is using a debit or credit card. With a debit card, funds are directly withdrawn from your checking account, while a credit card allows you to borrow money from the issuer up to your credit limit.
Benefits:
- Instant payment processing.
- Widely accepted at stores, online retailers, and for recurring bills.
- Built-in security features like fraud protection.
Tip: Credit cards also offer rewards programs and better purchase protection, making them a great choice for larger transactions.
2. Online Bill Pay
Most banks and financial institutions offer online bill pay services, which allow you to schedule and pay your bills directly from your bank account. This service can be used to pay utilities, credit card bills, loans, and more.
Benefits:
- No need to write and mail checks.
- Set up automatic payments to avoid late fees.
- Easily track payment history.
Tip: Many services allow you to pay by check through online bill pay, so you can still choose to use a check without writing one yourself.
3. Mobile Payment Apps (Venmo, PayPal, Zelle, etc.)
Mobile payment apps like Venmo, PayPal, and Zelle are growing in popularity, offering a fast and convenient way to transfer money between individuals or businesses. With just a few taps, you can send or receive money instantly.
Benefits:
- Instant or near-instant money transfers.
- Easy to use on your smartphone.
- Secure, with encryption and fraud protection.
Tip: Zelle is often integrated directly into many banking apps, allowing you to send money directly from your account without any fees.
4. Wire Transfers
For large or time-sensitive transactions, wire transfers are an excellent alternative. This method allows you to send money directly from one bank to another, often with next-day processing.
Benefits:
- Secure and reliable.
- Best for large transactions or sending money internationally.
Tip: Wire transfers may have fees, especially for international payments, so always check with your bank before proceeding.
5. Cash
In some situations, cash remains the most straightforward payment method. While it may not be convenient for larger sums, it can be a practical choice for small payments or personal transactions.
Benefits:
- Immediate and accepted almost everywhere.
- No need for an intermediary (like a bank or app).
Tip: Always keep track of your cash transactions to avoid losing track of payments.
While checks still serve a useful purpose in certain situations, the alternatives mentioned above can offer greater convenience, security, and efficiency for most of your payments. Whether it’s through digital banking, mobile apps, or good old-fashioned cash, the modern payment landscape is designed to make transactions faster and simpler.
Conclusion
In today’s fast-paced world, knowing how to write a check may seem like an old-fashioned skill, but it’s still an important one. From paying rent and making donations to handling personal transactions, checks remain a vital tool in certain situations. By following the step-by-step guide we’ve provided, you’ll be able to fill out checks confidently and accurately, avoiding common mistakes and ensuring smooth transactions.
However, it’s also important to remember that checks aren’t the only payment option available. With the rise of mobile payments, debit and credit cards, and online bill pay services, there are plenty of alternatives to consider depending on your needs. Whether you’re paying a business, a friend, or handling a large payment, there’s a digital solution that can make the process even more convenient and secure.
So, the next time you need to write a check or make a payment, refer to this guide for clarity and ensure you’re using the best method for your transaction. If you have any more questions about check writing or payment alternatives, feel free to explore our other resources or drop a comment below!
Take action now by practicing writing a check and exploring mobile payment options that suit your needs—stay ahead of the curve in today’s financial world!
FAQ Section
- How do I write a check to myself?
- Writing a check to yourself is simple. Just write your name where it says “Pay to the Order of” and follow the normal process for the rest of the check.
- Can I write a check without a bank account?
- No, you need a bank account to write a valid check. The check needs to be tied to your account so the funds can be deducted.
- What should I do if I lost a checkbook?
- Immediately report it to your bank to prevent unauthorized use. You may also want to place a stop-payment order on any uncashed checks.
Related content:
- 5 Digital Skills That Pay in 2025
- Best Online Certifications to Boost Your Resume
- How to Create a Career Development Plan
- How to Set Career Goals You’ll Actually Achieve
- Signs It’s Time to Change Your Career Path
Where to Learn These Skills
You don’t need to enroll in a 4-year program. Try:
- Coursera (certified programs from top universities)
- LinkedIn Learning
Many of these platforms offer certificates, practice projects, and eve

I’m Olivia Blake, the voice behind Job Boost 4U. I help people like you land better jobs and earn online with practical, honest tips.
Read more…